

🔧 How to Clean Your Dryer Vent Like a Pro (DIY Guide with Photos)
- Duct&Dryer Pros

- Aug 2, 2025
- 4 min read
Updated: Sep 30, 2025

🚨 Why Dryer Vent Cleaning Matters
Dryer vent cleaning is one of the most important—and easiest—home maintenance tasks. Yet many homeowners overlook it until it’s too late.
Over time, lint builds up inside your dryer duct, restricting airflow. This forces your dryer to work harder (wearing out the unit), takes longer to dry, and, worst of all, poses a serious fire hazard.
🔥 In the U.S., over 16,000 house fires annually are caused by clogged dryer vents. Lint is highly flammable; when airflow is blocked, it can ignite in the heating element.

📅 How Often to Clean Your Dryer Vent
Experts recommend cleaning your dryer vent at least once a year—and every six months if you have high usage, pets, or heavy-duty fabrics.
When to Call a Professional
It's been over 5 years of normal use (or over 3 years with heavy use)
There is no airflow at all at the outlet when the dryer is running
Your ductwork makes multiple sharp turns
It's longer than 25 feet
The outlet is located on the roof, or you can not locate it at all

🧰 What You’ll Need for DIY Cleaning
If you're missing any of the tools listed below, links to trusted and tested products that we, as professionals, use daily are attached
Tool | Purpose | Where to get |
🪄 Dryer vent brush - 12ft. | For pipes up to 12 ft. | |
🪄 Dryer vent brush - 24ft. | For pipes up to 24 ft. | |
⏹️ Lint filter hose & brush | Filter compartment cleaning | |
🔫 Cordless drill | To spin the brush and rods | |
🖲 Shop vacuum | To remove loose lint | |
🪜 Step ladder | If your outlet is elevated | |
🪛 Screwdriver | Flexible vent disassembly | |
🍥 Foil tape | Flexible vent connection | |
⚙️ Flexible dryer hose | Flexible hose replacement |
Pro tip:
► The vacuum unit suction should preferably be compatible with the one we recommend.
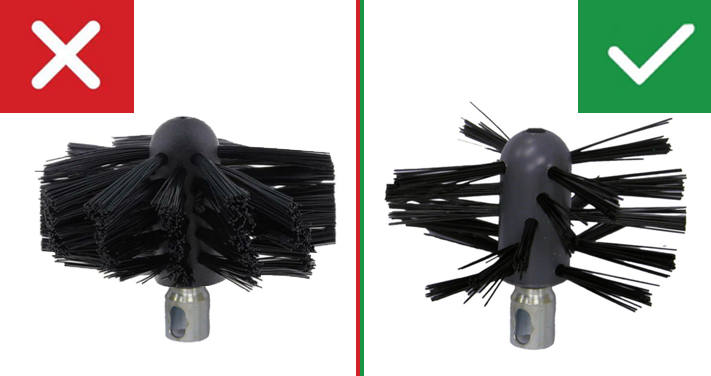
► Brush heads with overly dense bristles can push lint deeper into the duct instead of dislodging it. Opt for a brush with moderate bristle density.
Let's Start the Cleaning!
👉 The following detailed process consists of three major steps:
⚪ Cleaning the dryer unit and the surrounding area
⚪ Cleaning the dryer duct from the inside opening using a brush and a shop vac
⚪ Cleaning the outlet and the dryer’s duct from the outside
If you have any questions about the process or need help, feel free to email us at support@dryerventprosco.com. We are here to help!
Step 1: Prep & Safety
Open windows for ventilation - it may smell of lint during cleaning
Wear gloves, goggles, face mask
Turn on the dryer and check the outlet outside
🚨 If you don’t feel ANY airflow coming out of the outlet, the duct may be damaged or fully clogged - we strongly recommend calling a pro.
Tape the outlet flap open - with a small piece of duct/foil tape, tape the flap to stay open. This will allow the vacuum's air flow to pass through the pipe freely later in the process.
Use your phone to take a quick inspection video inside the duct - if you notice any disconnection or major blockages (like bird nests) - we'd suggest calling a professional

Step 2: Cleaning the Dryer Unit and Its Surrounding Area
Unplug the unit and gently move it away from the wall.
*Note: If it’s a gas dryer or has a water line, be extra careful not to damage the hoses
Remove the lint filter and clean inside the trap compartment using an extended brush and a narrow vacuum nozzle.
*Pro tip: Make sure you not only clean the lint filter before each use, but also wash it when the spores are clogged.
Get behind the dryer. Disconnect the flexible vent from the wall and from the dryer, and thoroughly vacuum it (or replace if damaged).
On the back of the dryer unit, brush and vacuum the air intakes and the round pipe. Vacuum the surroundings.


Step 3: Brushing the Main Duct from Inside
Insert your vacuum hose into the duct and seal the remaining space with a rag, and run suction for a minute or so. This will remove the first layer and the bigger clumps of lint.
Attach the brush to the drill
Only rotate the drill clockwise. Counterclockwise rotation can loosen and disconnect the rods. To prevent this from happening, you can either tape every rod connection or the drill's direction switch. When adding rods, release the drill manually
Add rods one at a time. To easier control the brush, add rods one at a time. Use a Slow to Moderate speed.
Carefully guide the brush back and forth, adding extension rods one at a time, until you feel resistance, usually caused by a 90-degree elbow. Half of the duct is cleaned!
Do not force the brush. Use moderate force, and if the brush does not pass the elbow, no worries, we'll get the other part of the duct from the outside later on.
Remove the brush and leave the vacuum hose inserted. Seal the remaining space around the hose with a rag.

Step 4: Cleaning the Outlet and Main Duct from the Outside
Keep the vacuum running and get to the outlet outside. You should feel the vacuum's suction pretty well.
Feed the brush and add rods one at a time. Use a Slow to Moderate speed and force.
Once it hits the elbow, stop and pull gently back.
Reconnect the dryer's flexible hose and gently push it back. Turn the dryer ON to check the air flow at the outside outlet.
Take an “after” video to compare

🎉 You Did It!
If you’ve followed every step, congratulations—your dryer vent is now clean and safe. You’ve improved airflow, increased energy efficiency, and significantly reduced fire risk.
📌 Quick Checklist
Clean annually
Use safety gear
Rotate the drill clockwise only
Add rods one by one
Stop when you hit restrictions
Call a pro if the vent has complex routing or no airflow
🔧
#HomeMaintenance#DIYHomeTips#DryerVentCleaning#CleanDryerVent#DIYDryerCleaning#HomeSafetyTips#PreventHouseFires#DryerCleaningDIY
🏠
#FirePrevention#LintFreeLiving#EnergyEfficiency#SaferHomes#DryerFireSafety#CloggedVentWarning#HomeHazardPrevention
📍
#ColoradoHomes#ColoradoCleaning#DuctAndDryerPros#DenverHVAC#ParkerCO#CastleRockCO
🎥
#HowToCleanDryerVent#DryerVentTutorial#BeforeAndAfterClean#CleaningTipsAndTricks#DIYCleaningHack#HomeCleaningTips


This is a thorough guide, but I wonder if DIY cleaning risks damaging vents compared to calling a pro, especially with complex duct layouts. https://appel.lol